

EX200試験問題集合格させるのは2024年最新の認証済み試験問題
EX200試験問題でリアルに更新された問題PDF
RedHat EX200は、Red Hat Certified System Administrator(RHCSA)試験としても知られており、認定されたRed Hatシステム管理者になりたい個人の知識とスキルをテストする認定試験です。この試験は、候補者がさまざまなタスクを実行し、Red Hat Enterprise Linuxシステムを管理する能力を評価するパフォーマンスベースのテストです。
RHCSA EX200 試験は、IT プロフェッショナルのスキルを現実世界の環境下でテストする実技試験です。この試験は、典型的な RHEL システム管理の役割に直面する IT プロフェッショナルが直面するタスクや課題をシミュレートするように設計されています。試験は、ソフトウェアのインストールや設定、ユーザーやグループの管理、ファイルシステムの管理、ネットワークサービスの構成など、さまざまなシステム管理タスクを実行することを求める一連のタスクから構成されています。
質問 # 32
Create a volume group, and set 8M as a extends. Divided a volume group containing 50 extends on volume group lv (lvshare), make it as ext4 file system, and mounted automatically under /mnt/dat a. And the size of the floating range should set between 380M and 400M.
正解:
解説:
# fdisk
# partprobe
# pvcreate /dev/vda6
# vgcreate -s 8M vg1 /dev/vda6 -s
# lvcreate -n lvshare -l 50 vg1 -l
# mkfs.ext4 /dev/vg1/lvshare
# mkdir -p /mnt/data
# vim /etc/fstab
/dev/vg1/lvshare /mnt/data ext4 defaults 0 0
# mount -a
# df -h
質問 # 33
SIMULATION
Create a swap space, set the size is 600 MB, and make it be mounted automatically after rebooting the system (permanent mount).
正解:
解説:
See explanation below.
Explanation/Reference:
Explanation:
if=/dev/zero of=/swapfile bs=1M count=600 mkswap /swapfile
/etc/fstab:
/swapfile swap swap defaults 0 0 mount -a
質問 # 34
Create a 2G swap partition which take effect automatically at boot-start, and it should not affect the original swap partition.
正解:
解説:
# fdisk /dev/sda
p
(check Partition table)
n
(create new partition: press e to create extended partition, press p to create the main partition, and the extended partition is further divided into logical partitions) Enter
+2G t
8 I
82
W
partx -a /dev/sda
partprobe
mkswap /dev/sda8
Copy UUID
swapon -a
vim /etc/fstab
UUID=XXXXX swap swap defaults 0 0
(swapon -s)
質問 # 35
Create one partitions having size 100MB and mount it on data.
正解:
解説:
see explanation below.
Explanation
1. Use fdisk /dev/hda to create new partition.
2. Type n For New partitions.
3. It will ask for Logical or Primary Partitions. Press l for logical.
4. It will ask for the Starting Cylinder: Use the Default by pressing Enter Key.
5. Type the Size: +100M you can specify either Last cylinder of size here.
6. Press P to verify the partitions lists and remember the partitions name.
7. Press w to write on partitions table.
8. Either Reboot or use partprobe command.
9. Use mkfs -t ext3 /dev/hda?
OR
mke2fs -j /dev/hda? To create ext3 filesystem.
vi /etc/fstab
Write:
/dev/hda? /data ext3 defaults 1 2
Verify by mounting on current Sessions also: mount /dev/hda? /data
質問 # 36
Create a new logical volume according to the following requirements:
The logical volume is named database and belongs to the datastore volume group and has a size of 50 extents.
Logical volumes in the datastore volume group should have an extent size of 16 MB.
Format the new logical volume with a ext3 filesystem.
The logical volume should be automatically mounted under /mnt/database at system boot time.
正解:
解説:
fdisk -cu /dev/vda
partx -a /dev/vda
pvcreate /dev/vdax
vgcreate datastore /dev/vdax -s 16M
lvcreate-l 50 -n database datastore
mkfs.ext3 /dev/datastore/database
mkdir /mnt/database
mount /dev/datastore/database /mnt/database/ df -Th
vi /etc/fstab
/dev/datastore /database /mnt/database/ ext3 defaults 0 0 mount -a
質問 # 37
SIMULATION
Make on /archive directory that only the user owner and group owner member can fully access.
正解:
解説:
See explanation below.
Explanation/Reference:
Explanation:
chmod 770 /archive
Verify using : ls -ld /archive Preview should be like:
drwxrwx--- 2 root sysuser 4096 Mar 16 18:08 /archive
To change the permission on directory we use the chmod command. According to the question that only the owner user (root) and group member (sysuser) can fully access the directory so: chmod 770 /archive
質問 # 38
Configure your Host Name, IP Address, Gateway and DNS.
Host name: station.domain40.example.com
/etc/sysconfig/network
hostname=abc.com
hostname abc.com
IP Address:172.24.40.40/24
Gateway172.24.40.1
DNS:172.24.40.1
正解:
解説:
see explanation below.
Explanation
# cd /etc/syscofig/network-scripts/
# ls
# vim ifcfg-eth0 (Configure IP Address, Gateway and DNS) IPADDR=172.24.40.40 GATEWAY=172.24.40.1 DNS1=172.24.40.1
# vim /etc/sysconfig/network
(Configure Host Name)
HOSTNAME= station.domain40.example.com
OR
Graphical Interfaces:
System->Preference->Network Connections (Configure IP Address, Gateway and DNS) Vim
/etc/sysconfig/network
(Configure Host Name)
質問 # 39
Upgrading the kernel as 2.6.36.7.1, and configure the system to Start the default kernel, keep the old kernel available.
正解:
解説:
Answer see in the explanation.
Explanation/Reference:
# cat /etc/grub.conf
# cd /boot
# lftp it
# get dr/dom/kernel-xxxx.rpm
# rpm -ivh kernel-xxxx.rpm
# vim /etc/grub.conf
default=0
質問 # 40
Part 1 (on Node1 Server)
Task 5 [Controlling Access to Files with ACLs]
Copy the file /etc/fstab to /var/tmp. Configure the following permissions on /var/tmp/fstab.
The file /var/tmp/fstab is owned by root user
The file /var/tmp/fstab is belongs to the root group
The file /var/tmp/fstab should be executable by anyone
The user harry is able to read and write on /var/tmp/fstab
The user natasha can neither read or write on /var/tmp/fstab
All other users (Current or future) have the ability to read /var/tmp/fstab
正解:
解説:
* [root@node1 ~]# cp -p /etc/fstab /var/tmp/
[root@node1 ~]# ls -lrt /etc/fstab
[root@node1 ~]# ls -lrt /var/tmp/fstab
[root@node1 ~]# chmod a+x /var/tmp/fstab
[root@node1 ~]# getfacl /var/tmp/fstab
[root@node1 ~]# setfacl -m u:harry:rw- /var/tmp/fstab
[root@node1 ~]# setfacl -m u:natasha:--- /var/tmp/fstab
[root@node1 ~]# getfacl /var/tmp/fstab
getfacl: Removing leading '/' from absolute path names
# file: var/tmp/fstab
# owner: root
# group: root
user::rwx
user:harry:rw-
user:natasha:---
group::r-x
mask::rwx
other::r-x
* [root@node1 ~]# su - natasha
[natasha@node1 ~]$ cat /var/tmp/fstab
cat: /var/tmp/fstab: Permission denied
質問 # 41
Download the document from ftp://instructor.example.com/pub/testfile, find all lines containing [abcde] and redirect to /MNT/answer document, then rearrange the order according the original content.
正解:
解説:
Download the file to /tmp first
grep [abcde] /tmp/testfile > /mnt/answer
質問 # 42
There are two different networks 192.168.0.0/24 and 192.168.1.0/24. Where 192.168.0.254 and
192.168.1.254 IP Address are assigned on Server. Verify your network settings by pinging 192.168.1.0/24 Network's Host.
正解:
解説:
see explanation below.
Explanation
* vi /etc/sysconfing/network NETWORKING=yes HOSTNAME=station?.example.com GATEWAY=192.168.0.254 service network restart
2.vi /etc/sysconfig/network-scripts/ifcfg-eth0 DEVICE=eth0
ONBOOT=yes
BOOTPROTO=static
IPADDR=X.X.X.X
NETMASK=X.X.X.X
GATEWAY=192.168.0.254
ifdown eth0
ifup eth0
質問 # 43
CORRECT TEXT
Add user: user1, set uid=601
Password: redhat
The user's login shell should be non-interactive.
正解:
解説:
# useradd -u 601 -s /sbin/nologin user1
# passwd user1
redhat
質問 # 44
SIMULATION
Configure the NTP service in your system.
正解:
解説:
See explanation below.
Explanation/Reference:
Explanation: system-config-date &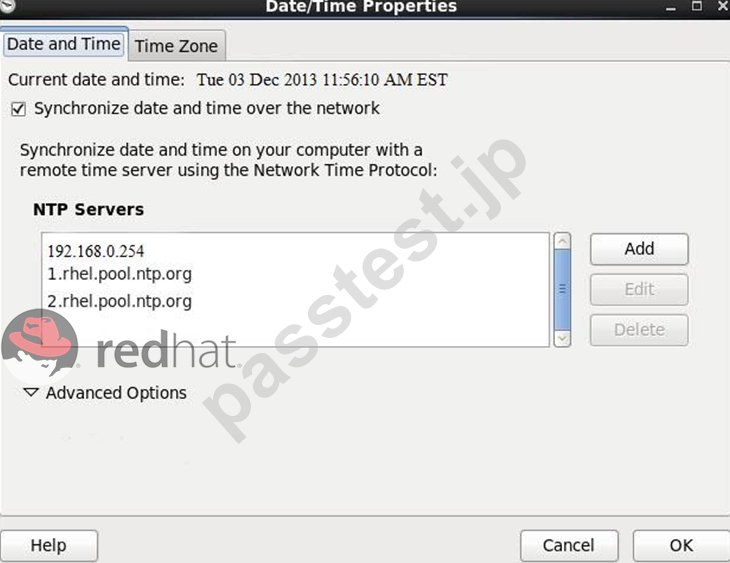
質問 # 45
Part 1 (on Node1 Server)
Task 16 [Running Containers]
Configure your host journal to store all journal across reboot
Copy all journal files from /var/log/journal/ and put them in the /home/shangrila/container-logserver Create and mount /home/shangrila/container-logserver as a persistent storage to the container as /var/log/ when container start
正解:
解説:
* [shangrila@node1 ~]$ podman ps
CONTAINER ID IMAGE COMMAND CREATED STATUS PORTS NAMES
d5ffe018a53c registry.domain15.example.com:5000/rhel8/rsyslog:latest /bin/rsyslog.sh 5 seconds ago Up 4 seconds ago logserver
[shangrila@node1 ~]$ podman stats logserver
Error: stats is not supported in rootless mode without cgroups v2
[shangrila@node1 ~]$ podman stop logserver
d5ffe018a53ca7eb075bf560d1f30822ab6fe51eba58fd1a8f370eda79806496
[shangrila@node1 ~]$ podman rm logserver
Error: no container with name or ID logserver found: no such container
[shangrila@node1 ~]$ mkdir -p container-journal/
* [shangrila@node1 ~]$ sudo systemctl restart systemd-journald
[sudo] password for shangrila:
[shangrila@node1 ~]$ sudo cp -av /var/log/journal/* container-journal/
[shangrila@node1 ~]$ sudo cp -av /var/log/journal/* container-journal/
[shangrila@node1 ~]$ sudo chown -R shangrila container-journal/
[shangrila@node1 ~]$ podman run -d --name logserver -v /home/shangrila/container-journal/:/var/log/journal:Z registry.domain15.example.com:5000/rhel8/rsyslog
[shangrila@node1 ~]$ podman ps
[shangrila@node1 ~]$ loginctl enable-linger
[shangrila@node1 ~]$ loginctl show-user shangrila|grep -i linger
Linger=yes
* [shangrila@node1 ~]$ podman stop logserver
[shangrila@node1 ~]$ podman rm logserver
[shangrila@node1 ~]$ systemctl --user daemon-reload
[shangrila@node1 ~]$ systemctl --user enable --now container-logserver
[shangrila@node1 ~]$ podman ps
CONTAINER ID IMAGE COMMAND CREATED STATUS PORTS NAMES
3903e1d09170 registry.domain15.example.com:5000/rhel8/rsyslog:latest /bin/rsyslog.sh 4 seconds ago Up 4 seconds ago logserver
[shangrila@node1 ~]$ systemctl --user stop container-logserver.service
* [shangrila@node1 ~]$ sudo reboot
[shangrila@node1 ~]$ podman ps -a
CONTAINER ID IMAGE COMMAND CREATED STATUS PORTS NAMES
7e6cd59c506a registry.domain15.example.com:5000/rhel8/rsyslog:latest /bin/rsyslog.sh 10 seconds ago Up 9 seconds ago logserver
質問 # 46
Part 1 (on Node1 Server)
Task 7 [Accessing Linux File Systems]
Find all the files owned by user natasha and redirect the output to /home/alex/files.
Find all files that are larger than 5MiB in the /etc directory and copy them to /find/largefiles.
正解:
解説:
[root@node1 ~]# find / -name natasha -type f > /home/natasha/files
[root@node1 ~]# cat /home/natasha/files
/var/spool/mail/natasha
/mnt/shares/natasha
[root@node1 ~]# mkdir /find
[root@node1 ~]# find /etc -size +5M > /find/largefiles
[root@node1 ~]# cat /find/largefiles
/etc/selinux/targeted/policy/policy.31
/etc/udev/hwdb.bin
質問 # 47
Configure your system so that it is an NTP client of server.domain11.example.com
正解:
解説:
#system-config-date
Note: dialog box will open in that
Check mark Synchronize date and time over network. Remove all the NTP SERVER and click ADD and type server.domain11.example.com
****************And then press ENTER and the press OK***************
質問 # 48
There is a local logical volumes in your system, named with common and belong to VGSRV volume group, mount to the /common directory. The definition of size is 128 MB.
Requirement:
Extend the logical volume to 190 MB without any loss of data. The size is allowed between 160-160 MB after extending.
正解:
解説:
see explanation below.
Explanation
lvextend -L 190M /dev/mapper/vgsrv-common resize2fs /dev/mapper/vgsrv-common
質問 # 49
A YUM repository has been provided at http://server.domain11.example.com/pub/x86_64/Server.
Configure your system to use this location as a default repository.
正解:
解説:
vim/etc/yum.repos/base.repo
[base]
name=base
baseurl= http://server.domain11.example.com/pub/x86_64/Server
gpgcheck=0
enable=1
Save and Exit
Use yum list for validation, the configuration is correct if list the package information. If the Yum configuration is not correct then maybe cannot answer the following questions.
質問 # 50
Install a FTP server, and request to anonymous download from /var/ftp/pub catalog. (it needs you to configure yum direct to the already existing file server.)
正解:
解説:
# cd /etc/yum.repos.d
# vim local.repo
[local]
name=local.repo
baseurl=file:///mnt
enabled=1
gpgcheck=0
# yum makecache
# yum install -y vsftpd
# service vsftpd restart
# chkconfig vsftpd on
# chkconfig --list vsftpd
# vim /etc/vsftpd/vsftpd.conf
anonymous_enable=YES
質問 # 51
Download ftp://192.168.0.254/pub/boot.iso to /root, and mounted automatically under /media/cdrom and which take effect automatically at boot-start.
正解:
解説:
see explanation below.
Explanation
# cd /root; wget ftp://192.168.0.254/pub/boot.iso
# mkdir -p /media/cdrom
# vim /etc/fstab
/root/boot.iso /media/cdrom iso9660 defaults,loop 0 0
# mount -a
mount [-t vfstype] [-o options] device dir
質問 # 52
Configure the verification mode of your host account and the password as LDAP. And it can login successfully through ldapuser40. The password is set as "password".
And the certificate can be downloaded from http://ip/dir/ldap.crt. After the user logs on the user has no host directory unless you configure the autofs in the following questions.
正解:
解説:
see explanation below.
Explanation
system-config-authentication
LDAP Server: ldap//instructor.example.com (In domain form, not write IP) OR
# yum groupinstall directory-client (1.krb5-workstation 2.pam-krb5 3.sssd)
# system-config-authentication
1.User Account Database: LDAP
2.LDAP Search Base DN: dc=example,dc=com
3.LDAP Server: ldap://instructor.example.com (In domain form, not write IP) 4.Download CA Certificate
5.Authentication Method: LDAP password
6.Apply
getent passwd ldapuser40
質問 # 53
Which section of the Prometheus configuration defines which nodes are monitored?
- A. rules
- B. scrape_config
- C. targets
- D. nodes
- E. listener
正解:B
解説:
Explanation/Reference: https://prometheus.io/docs/prometheus/latest/getting_star
質問 # 54
Part 1 (on Node1 Server)
Task 8 [Managing Local Users and Groups]
Create a user fred with a user ID 3945. Give the password as iamredhatman
正解:
解説:
* [root@node1 ~]# useradd -u 3945 fred
[root@node1 ~]# echo "iamredhatman" | passwd --stdin fred
Changing password for user fred.
passwd: all authentication tokens updated successfully
質問 # 55
......
合格させる保証付き無料クイズ2024年最新の実際に出ると確認されたRedHat:https://www.passtest.jp/RedHat/EX200-shiken.html
無料RHCSA EX200究極の学習ガイド:https://drive.google.com/open?id=1O53-5rzXaZirl0DUTALetCBifSH5xFby