

[2024年02月26日] 無料Kubernetes Administrator CKA試験問題を使おう
CKA問題集でKubernetes Administrator必ず合格できる練習問題集
Linux Foundation Certified Kubernetes Administrator(CKA)プログラムは、Kubernetesクラスターの展開、管理、トラブルシューティングに関して、個人の知識とスキルをテストするように設計された認定試験です。 Kubernetesは、コンテナオーケストレーションに使用される強力なツールであり、コンテナ化の増加により、近年ますます人気が高まっています。 CKAプログラムは、専門家がKubernetesの専門知識を紹介し、実際の環境でこのテクノロジーを操作する能力を実証する優れた方法です。
CKA試験では、インストールと構成、アプリケーションライフサイクル管理、ネットワーキング、セキュリティ、ストレージなど、さまざまなKubernetesの概念における候補者の習熟度を評価します。これは、一連の実践的なタスクを通じて、現実世界のシナリオでスキルを実証することを候補者に要求するパフォーマンスベースの試験です。試験はオンラインで実施され、候補者にはライブKubernetesクラスターにアクセスするコマンドラインインターフェイスが提供されます。試験はタイミングがあり、候補者は割り当てられたタスクを完了するために3時間あります。 CKA認定は、専門家がKubernetesの専門知識を実証し、業界でのスキルの認識を得るための優れた方法です。
CKA試験は、Kubernetesクラスターを管理および展開する上での実践的なスキルを個人がテストするパフォーマンスベースの試験です。この試験は、現実世界のシナリオをシミュレートするために設計された一連のハンズオンタスクで構成されています。これらのタスクは、Kubernetesクラスターを展開、管理、トラブルシューティングする能力のテスト及びネットワーキング、セキュリティ、ストレージの構成も含まれます。この試験はオンラインで行われ、世界中のどこからでも受験することができます。
質問 # 40
Check the history of the specific revision of that deployment
正解:
解説:
kubectl rollout history deploy webapp --revision=3
質問 # 41
List all the pods sorted by created timestamp
正解:
解説:
kubect1 get pods--sort-by=.metadata.creationTimestamp
質問 # 42
List all the pods sorted by name
正解:
解説:
kubect1 get pods --sort-by=.metadata.name
質問 # 43
Score: 4%
Task
Check to see how many nodes are ready (not including nodes tainted NoSchedule ) and write the number to
/opt/KUSC00402/kusc00402.txt
正解:
解説:
See the solution below.
Explanation
Solution:
kubectl describe nodes | grep ready|wc -l
kubectl describe nodes | grep -i taint | grep -i noschedule |wc -l
echo 3 > /opt/KUSC00402/kusc00402.txt
#
kubectl get node | grep -i ready |wc -l
# taintsnoSchedule
kubectl describe nodes | grep -i taints | grep -i noschedule |wc -l
#
echo 2 > /opt/KUSC00402/kusc00402.txt
質問 # 44
Create a Job with an image node which prints node version and
verifies there is a pod created for this job
- A. kubectl create job nodeversion --image=node -- node -v
kubectl get job -w
kubectl get pod
YAML File:
apiVersion: batch/v1
kind: Job
metadata:
labels:
job-name: nodeversion
name: nodeversion
spec:
completions: 1
parallelism: 1
labels:
job-name: nodeversion
spec:
containers:
- command:
- node
- -v
image: node
imagePullPolicy: Always
name: nodeversion
restartPolicy: Never - B. kubectl create job nodeversion --image=node -- node -v
kubectl get job -w
kubectl get pod
YAML File:
apiVersion: batch/v1
kind: Job
metadata:
labels:
job-name: nodeversion
name: nodeversion
spec:
completions: 1
parallelism: 1
selector:
matchLabels:
job-name: nodeversion
template:
metadata:
labels:
job-name: nodeversion
spec:
containers:
- command:
- node
- -v
image: node
imagePullPolicy: Always
name: nodeversion
restartPolicy: Never
正解:B
質問 # 45
Score: 4%
Task
Create a pod named kucc8 with a single app container for each of the following images running inside (there may be between 1 and 4 images specified): nginx + redis + memcached .
正解:
解説:
Solution:
kubectl run kucc8 --image=nginx --dry-run -o yaml > kucc8.yaml
# vi kucc8.yaml
apiVersion: v1
kind: Pod
metadata:
creationTimestamp: null
name: kucc8
spec:
containers:
- image: nginx
name: nginx
- image: redis
name: redis
- image: memcached
name: memcached
- image: consul
name: consul
#
kubectl create -f kucc8.yaml
#12.07
質問 # 46
Check the image version in pod without the describe command
正解:
解説:
See the solution below.
Explanation
kubectl get po nginx -o
jsonpath='{.spec.containers[].image}{"\n"}'
質問 # 47
Score: 4%
Task
Create a persistent volume with name app-data , of capacity 1Gi and access mode ReadOnlyMany. The type of volume is hostPath and its location is /srv/app-data .
正解:
解説:
See the solution below.
Explanation
Solution:
#vi pv.yaml
apiVersion: v1
kind: PersistentVolume
metadata:
name: app-config
spec:
capacity:
storage: 1Gi
accessModes:
- ReadOnlyMany
hostPath:
path: /srv/app-config
#
kubectl create -f pv.yaml
質問 # 48
Change the label for one of the pod to env=uat and list all the pods to verify
正解:
解説:
kubectl label pod/nginx-dev3 env=uat --overwrite kubectl get pods --show-labels
質問 # 49
Apply the autoscaling to this deployment with minimum 10 and maximum 20 replicas and target CPU of 85% and verify hpa is created and replicas are increased to 10 from 1
正解:
解説:
kubectl autoscale deploy webapp --min=10 --max=20 --cpu percent=85 kubectl get hpa kubectl get pod -l app=webapp
質問 # 50
Create a persistent volume with name app-data, of capacity 2Gi and access mode ReadWriteMany. The type of volume is hostPath and its location is /srv/app-data.
正解:
解説:
solution
Persistent Volume
A persistent volume is a piece of storage in a Kubernetes cluster. PersistentVolumes are a cluster-level resource like nodes, which don't belong to any namespace. It is provisioned by the administrator and has a particular file size. This way, a developer deploying their app on Kubernetes need not know the underlying infrastructure. When the developer needs a certain amount of persistent storage for their application, the system administrator configures the cluster so that they consume the PersistentVolume provisioned in an easy way.
Creating Persistent Volume
kind: PersistentVolume apiVersion: v1 metadata: name:app-data spec: capacity: # defines the capacity of PV we are creating storage: 2Gi #the amount of storage we are tying to claim accessModes: # defines the rights of the volume we are creating - ReadWriteMany hostPath: path: "/srv/app-data" # path to which we are creating the volume Challenge Create a Persistent Volume named app-data, with access mode ReadWriteMany, storage classname shared, 2Gi of storage capacity and the host path /srv/app-data.
2. Save the file and create the persistent volume.
3. View the persistent volume.
Our persistent volume status is available meaning it is available and it has not been mounted yet. This status will change when we mount the persistentVolume to a persistentVolumeClaim.
PersistentVolumeClaim
In a real ecosystem, a system admin will create the PersistentVolume then a developer will create a PersistentVolumeClaim which will be referenced in a pod. A PersistentVolumeClaim is created by specifying the minimum size and the access mode they require from the persistentVolume.
Challenge
Create a Persistent Volume Claim that requests the Persistent Volume we had created above. The claim should request 2Gi. Ensure that the Persistent Volume Claim has the same storageClassName as the persistentVolume you had previously created.
kind: PersistentVolume apiVersion: v1 metadata: name:app-data
spec:
accessModes: - ReadWriteMany resources:
requests: storage: 2Gi
storageClassName: shared
2. Save and create the pvc
njerry191@cloudshell:~ (extreme-clone-2654111)$ kubect1 create -f app-data.yaml persistentvolumeclaim/app-data created
3. View the pvc
4. Let's see what has changed in the pv we had initially created.
Our status has now changed from available to bound.
5. Create a new pod named myapp with image nginx that will be used to Mount the Persistent Volume Claim with the path /var/app/config.
Mounting a Claim
apiVersion: v1 kind: Pod metadata: creationTimestamp: null name: app-data spec: volumes: - name:congigpvc persistenVolumeClaim: claimName: app-data containers: - image: nginx name: app volumeMounts: - mountPath: "/srv/app-data " name: configpvc
質問 # 51
Print pod name and start time to "/opt/pod-status" file
正解:
解説:
kubect1 get pods -o=jsonpath='{range .items[*]}{.metadata.name}{"\t"}{.status.podIP}{"\n"}{end}'
質問 # 52
An administrator accidentally closed the commit window/screen before the commit was finished. Which two options could the administrator use to verify the progress or success of that commit task? (Choose two)
- A. Task Manager
- B. System Logs
- C. Configuration Logs
- D. Traffic Logs
正解:A、C
質問 # 53
Create a deployment called webapp with image nginx having 5 replicas in it, put the file in /tmp directory with named webapp.yaml
- A. //Create a file using dry run command
kubectl create deploy --image=nginx --dry-run -o yaml >
/tmp/webapp.yaml
// Now, edit file webapp.yaml and update replicas=5
apiVersion: apps/v1
kind: Deployment
metadata:
labels:
app: webapp
name: webapp
spec:
replicas: 5
selector:
matchLabels:
app: webapp
template:
metadata:
labels:
Note: Search "deployment" in kubernetes.io site , you will get
the page
https://kubernetes.io/docs/concepts/workloads/controllers/deplo
yment/
// Verify the Deployment
kubectl get deploy webapp --show-labels
// Output the YAML file of the deployment webapp
kubectl get deploy webapp -o yaml - B. //Create a file using dry run command
kubectl create deploy --image=nginx --dry-run -o yaml >
/tmp/webapp.yaml
// Now, edit file webapp.yaml and update replicas=5
apiVersion: apps/v1
kind: Deployment
metadata:
labels:
app: webapp
name: webapp
spec:
replicas: 5
selector:
matchLabels:
app: webapp
template:
metadata:
labels:
app: webapp
spec:
containers:
- image: nginx
name: nginx
Note: Search "deployment" in kubernetes.io site , you will get
the page
https://kubernetes.io/docs/concepts/workloads/controllers/deplo
yment/
// Verify the Deployment
kubectl get deploy webapp --show-labels
// Output the YAML file of the deployment webapp
kubectl get deploy webapp -o yaml
正解:B
質問 # 54
Set the node named ek8s-node-1 as unavailable and reschedule all the pods running on it.
正解:
解説:
See the solution below.
Explanation
solution
質問 # 55
List all the pods showing name and namespace with a json path expression
正解:
解説:
kubectl get pods -o=jsonpath="{.items[*]['metadata.name',
'metadata.namespace']}"
質問 # 56
Create a nginx pod that will be deployed to node with the label
"gpu=true"
- A. kubectl run nginx --image=nginx --restart=Always --dry-run -o
yaml > nodeselector-pod.yaml
// add the nodeSelector like below and create the pod
kubectl apply -f nodeselector-pod.yaml
vim nodeselector-pod.yaml
apiVersion: v1
kind: Pod
metadata:
name: nginx
spec:
nodeSelector:
gpu: true
yaml
//Verify
kubectl get no -show-labels
kubectl get po
kubectl describe po nginx | grep Node-Selectors - B. kubectl run nginx --image=nginx --restart=Always --dry-run -o
yaml > nodeselector-pod.yaml
// add the nodeSelector like below and create the pod
kubectl apply -f nodeselector-pod.yaml
vim nodeselector-pod.yaml
apiVersion: v1
kind: Pod
metadata:
name: nginx
spec:
nodeSelector:
gpu: true
containers:
- image: nginx
name: nginx
restartPolicy: Always
kubectl apply -f nodeselector-pod.yaml
//Verify
kubectl get no -show-labels
kubectl get po
kubectl describe po nginx | grep Node-Selectors
正解:B
質問 # 57
Create a deployment spec file that will:
* Launch 7 replicas of the nginx Image with the labelapp_runtime_stage=dev
* deployment name: kual00201
Save a copy of this spec file to /opt/KUAL00201/spec_deployment.yaml
(or /opt/KUAL00201/spec_deployment.json).
When you are done, clean up (delete) any new Kubernetes API object that you produced during this task.
正解:
解説:
See the solution below.
Explanation
solution
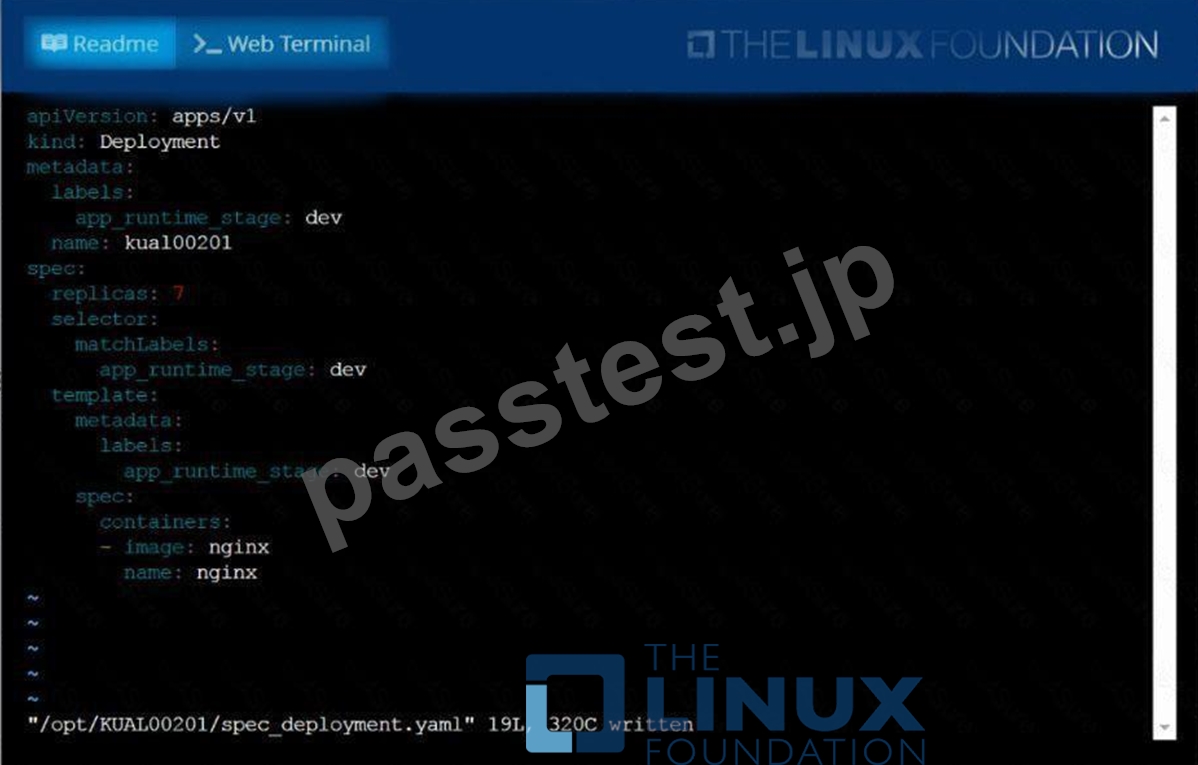
質問 # 58
For this item, you will have to ssh to the nodes ik8s-master-0 and ik8s-node-0 and complete all tasks on these nodes. Ensure that you return to the base node (hostname: node-1) when you have completed this item.
Context
As an administrator of a small development team, you have been asked to set up a Kubernetes cluster to test the viability of a new application.
Task
You must use kubeadm to perform this task. Any kubeadm invocations will require the use of the
--ignore-preflight-errors=all option.
* Configure the node ik8s-master-O as a master node. .
* Join the node ik8s-node-o to the cluster.
正解:
解説:
See the solution below.
Explanation
solution
You must use the kubeadm configuration file located at /etc/kubeadm.conf when initializingyour cluster.
You may use any CNI plugin to complete this task, but if you don't have your favourite CNI plugin's manifest URL at hand, Calico is one popular option: https://docs.projectcalico.org/v3.14/manifests/calico.yaml Docker is already installed on both nodes and has been configured so that you can install the required tools.
質問 # 59
......
Linux Foundation CKA実際の問題とブレーン問題集:https://www.passtest.jp/Linux-Foundation/CKA-shiken.html
合格させるCKA試験には更新されたのはCKA試験問題集PDF2024:https://drive.google.com/open?id=1OSLSGoUKtF8viwrmHgWVduzm_MdxUrXk