

[2024年10月] 検証済みLinux Foundation試験問題集でCKA試験学習ガイド
ベスト品質のLinux Foundation CKA試験解答リアル練習試験問題集で[2024]
CKA試験は、Kubernetes管理の専門家の知識と習熟度をテストするように設計されています。この試験は、Kubernetesクラスターを展開、構成、管理、およびトラブルシューティングする候補者の能力を評価する一連のパフォーマンスベースのタスクで構成されています。この試験はオンラインで実施されており、候補者は指定された時間枠内で一連の実用的なタスクを完了する必要があります。この試験では、クラスターアーキテクチャ、ネットワーキング、ストレージ、セキュリティ、トラブルシューティングなど、幅広いKubernetes管理トピックをカバーしています。
Linux Foundation CKA(Certified Kubernetes Administrator)プログラム試験は、Kubernetesで作業する専門家のスキルや知識を試験するために設計された認定試験です。この試験は、候補者がKubernetesクラスタを展開、構成、管理する能力を評価するように設計されています。この認定は、グローバルに認められた資格であり、IT専門家にとって貴重な資格とされています。
質問 # 23
Given a partially-functioning Kubernetes cluster, identify symptoms of failure on the cluster.
Determine the node, the failing service, and take actions to bring up the failed service and restore the health of the cluster. Ensure that any changes are made permanently.
You can ssh to the relevant I nodes (bk8s-master-0 or bk8s-node-0) using:
[student@node-1] $ ssh <nodename>
You can assume elevated privileges on any node in the cluster with the following command:
[student@nodename] $ | sudo -i
正解:
解説:
solution


質問 # 24
Install a kubernetes cluster with one master and one worker using kubeadm
- A. This is a straightforward question, you need to install kubernetes cluster using kubeadm with one master and one worker.
Refer : https://kubernetes.io/docs/setup/production-environment/tools/kubeadm/ - B. This is a straightforward question, you need to install kubernetes cluster using kubeadm with one master and one worker.
Installation is considered success once both master and worker
nodes become available.
Refer : https://kubernetes.io/docs/setup/production-environment/tools/kubeadm/
正解:B
質問 # 25
List all the pods sorted by created timestamp
正解:
解説:
kubect1 get pods--sort-by=.metadata.creationTimestamp
質問 # 26
Create an nginx pod with containerPort 80 and it should check the pod running at endpoint / healthz on port 80 and verify and delete the pod.
- A. kubectl run nginx --image=nginx --restart=Always --port=80 --
dry-run -o yaml > nginx-pod.yaml
// add the livenessProbe section and create
apiVersion: v1
kind: Pod
metadata:
labels:
run: nginx
name: nginx
spec:
containers:
- image: nginx
name: nginx
ports:
- containerPort: 80
livenessProbe:
httpGet:
path: /healthz
port: 80
restartPolicy: Always
kubectl create -f nginx-pod.yaml
// verify
kubectl describe pod nginx | grep -i readiness
kubectl delete po nginx - B. kubectl run nginx --image=nginx --restart=Always --port=80 --
dry-run -o yaml > nginx-pod.yaml
// add the livenessProbe section and create
apiVersion: v1
kind: Pod
metadata:
labels:
containers:
- image: nginx
name: nginx
ports:
- containerPort: 60
livenessProbe:
httpGet:
path: /healthz
port: 60
restartPolicy: Always
kubectl create -f nginx-pod.yaml
// verify
kubectl describe pod nginx | grep -i readiness
kubectl delete po nginx
正解:A
質問 # 27
Create a deployment as follows:
Name: nginx-app
Using container nginx with version 1.11.10-alpine
The deployment should contain 3 replicas
Next, deploy the application with new version 1.11.13-alpine, by performing a rolling update.
Finally, rollback that update to the previous version 1.11.10-alpine.
正解:
解説:
solution


質問 # 28
Check to see how many worker nodes are ready (not including nodes tainted NoSchedule) and write the number to /opt/KUCC00104/kucc00104.txt.
正解:
解説:
solution

質問 # 29
List all the pods sorted by name
正解:
解説:
kubect1 get pods --sort-by=.metadata.name
質問 # 30
Create a pod that echo "hello world" and then exists. Have the pod deleted automatically when it's completed
正解:
解説:
See the solution below.
Explanation
kubectl run busybox --image=busybox -it --rm --restart=Never --
/bin/sh -c 'echo hello world'
kubectl get po # You shouldn't see pod with the name "busybox"
質問 # 31
Create PersistentVolume named task-pv-volume with storage 10Gi, access modes ReadWriteMany, storageClassName manual, and volume at /mnt/data and Create a PersistentVolumeClaim of at least 3Gi storage and access mode ReadWriteOnce and verify
- A. vim task-pv-volume.yaml
apiVersion: v1
kind: PersistentVolume
metadata:
name: task-pv-volume
labels:
type: local
spec:
storageClassName: manual
capacity:
storage: 10Gi
accessModes:
- ReadWriteMany
hostPath:
path: "/mnt/data"
kubectl apply -f task-pv-volume.yaml
//Verify
kubectl get pv
vim task-pvc-volume.yaml
apiVersion: v1
- ReadWriteMany
resources:
requests:
storage: 3Gi
kubectl apply -f task-pvc-volume.yaml
//Verify
Kuk kubectl get pvc - B. vim task-pv-volume.yaml
apiVersion: v1
kind: PersistentVolume
metadata:
name: task-pv-volume
labels:
type: local
spec:
storageClassName: manual
capacity:
storage: 10Gi
accessModes:
- ReadWriteMany
hostPath:
path: "/mnt/data"
kubectl apply -f task-pv-volume.yaml
//Verify
kubectl get pv
vim task-pvc-volume.yaml
apiVersion: v1
kind: PersistentVolumeClaim
metadata:
name: task-pv-claim
spec:
storageClassName: manual
accessModes:
- ReadWriteMany
resources:
requests:
storage: 3Gi
kubectl apply -f task-pvc-volume.yaml
//Verify
Kuk kubectl get pvc
正解:B
質問 # 32
A Kubernetes worker node, named wk8s-node-0 is in state NotReady. Investigate why this is the case, and perform any appropriate steps to bring the node to a Ready state, ensuring that any changes are made permanent.
You can ssh to the failed node using:
[student@node-1] $ | ssh Wk8s-node-0
You can assume elevated privileges on the node with the following command:
[student@w8ks-node-0] $ | sudo -i
正解:
解説:
See the solution below.
Explanation
solution


質問 # 33
Add a taint to node "worker-2" with effect as "NoSchedule" and
list the node with taint effect as "NoSchedule"
- A. // Add taint to node "worker-2"
kubectl taint nodes worker-2 key=value:NoSchedule
// Verify
// Using "custom-coloumns" , you can customize which coloumn to
be printed
kubectl get nodes -o customcolumns=NAME:.metadata.name,TAINTS:.spec.taints --no-headers
// Using jsonpath
kubectl get nodes -o jsonpath="{range
.items[*]}{.metadata.name} {.spec.taints[?(
@.effect=='NoSchedule' )].effect}{\"\n\"}{end}" | awk 'NF==2
{print $0}' - B. // Add taint to node "worker-2"
kubectl taint nodes worker-2 key=value:NoSchedule
.items[*]}{.metadata.name} {.spec.taints[?(
@.effect=='NoSchedule' )].effect}{\"\n\"}{end}" | awk 'NF==2
{print $0}'
正解:A
質問 # 34
Get list of all the pods showing name and namespace with a jsonpath expression.
正解:
解説:
See the solution below.
Explanation
kubectl get pods -o=jsonpath="{.items[*]['metadata.name'
, 'metadata.namespace']}"
質問 # 35
Create a job named "hello-job" with the image busybox which echos "Hello I'm running job"
- A. kubectl create job hello-job --image=busybox --dry-run -o yaml
-- echo "Hello I'm running job" > hello-job.yaml
kubectl create -f hello-job.yaml
//Verify Job
kubectl get job
kubectl get po
kubectl logs hello-job-* - B. kubectl create job hello-job --image=busybox --dry-run -o yaml
-- echo "Hello I'm running job" > hello-job.yaml
kubectl create -f hello-job.yaml
//Verify Job
kubectl get po
kubectl logs hello-job-*
正解:A
質問 # 36
Annotate the pod with name=webapp
- A. kubectl annotate pod nginx-dev-pod name=webapp
kubectl annotate pod nginx-prod-pod name=webapp
// Verify
kubectl describe po nginx-dev-pod | grep -i annotations
kubectl describe po nginx-prod-pod | grep -i annotations - B. kubectl annotate pod nginx-dev-pod name=webapp
kubectl annotate pod nginx-prod-pod name=webapp
// Verify
kubectl describe po nginx-dev-pod | grep -i annotations
正解:A
質問 # 37
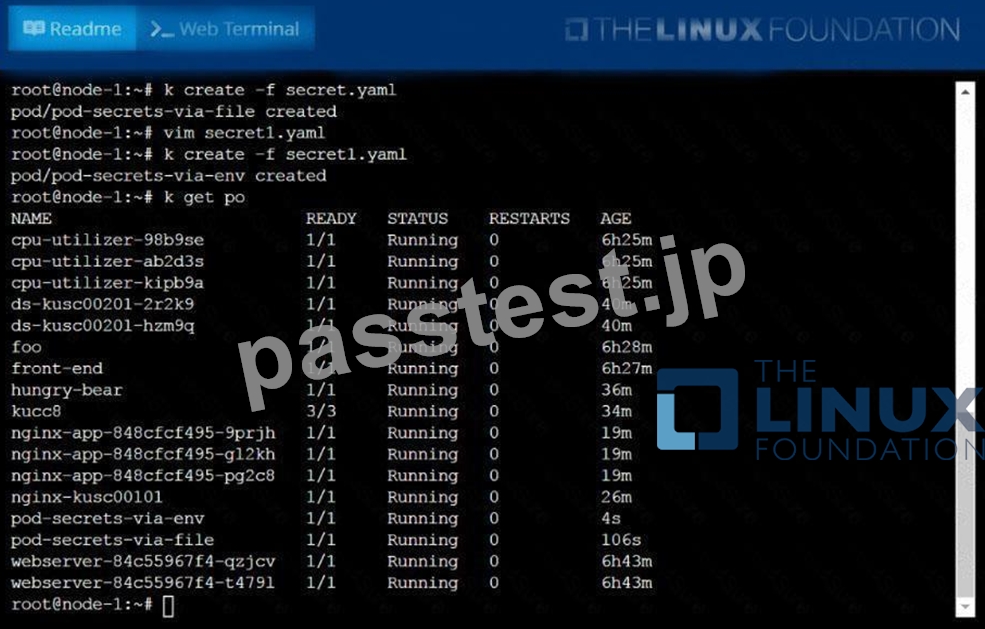
Create a Kubernetes secret as follows:
* Name: super-secret
* password: bob
Create a pod named pod-secrets-via-file, using the redis Image, which mounts a secret named super-secret at
/secrets.
正解:
解説:
Create a second pod named pod-secrets-via-env, using the redis Image, which exports password as CONFIDENTIAL See the solution below.
Explanation
solution

質問 # 38
Get IP address of the pod - "nginx-dev"
正解:
解説:
Kubect1 get po -o wide
Using JsonPath
kubect1 get pods -o=jsonpath='{range
.items[*]}{.metadata.name}{"\t"}{.status.podIP}{"\n"}{end}'
質問 # 39
List all persistent volumes sorted bycapacity, saving the fullkubectloutput to
/opt/KUCC00102/volume_list. Usekubectl 's own functionality forsorting the output, and do not manipulate it any further.
正解:
解説:
See the solution below.
Explanation
solution
質問 # 40
......
正真正銘のベスト材料CKA:https://www.passtest.jp/Linux-Foundation/CKA-shiken.html
CKAテストエンジン練習試験:https://drive.google.com/open?id=1uj1WUMwx5z_5MktQ_QtIHyUum9OpN4jA